Home Sauna DIY: Everything You Need to Know to Build One Yourself
Disclosure : This post may contain affiliate links or paid partnerships. I may earn compensation if you click a link or make a purchase, at no additional cost to you. See my disclosure for more info.
It keeps calling you back.
That warm, quiet room. Steam curling off the rocks. The feeling of tension dissolving out of your muscles one layer at a time.
You want that at home. Of course you do.
So you start looking into it. And within minutes, you’re drowning. Forum arguments about heater brands. Contradicting advice on insulation. Some guy on Reddit claiming he built one for $200. Another saying it cost him $8,000.
Who do you believe?
You close everything. You add it to the mental pile of “things I’ll get to eventually.”
But you and I both know — eventually is a polished word for never.
The good news? Building a home sauna isn’t as impossible as the internet makes it seem. You just need someone to cut through the noise and lay it out straight.
That’s what’s happening right now. Let’s build this thing.
Why DIY Sauna Dreams Die on the Vine
It’s not the physical labor that stops you. It’s the terror of an expensive mistake.
You see yourself buying materials you don’t need. Installing something backwards. Ending up with a room that grows mold instead of generating steam.
Understandable. But that fear comes from a lack of clarity, not a lack of ability.
Most sauna builds fail because people skip the foundation and jump straight to aesthetics. They’re picking out backrests before they’ve thought about vapor barriers. They’re pricing out a sauna essentials kit before they’ve decided what type of heat they want.
You’re going to do the opposite.
1. Pick the Right Location First — It Determines Everything Else
Before you sketch a single plan, decide where this sauna will live.
Strong candidates include:
- A spare bathroom or corner of the basement
- A garage section
- A shed or detached structure
- A large walk-in closet (for compact infrared setups)
Non-negotiables: proximity to a floor drain, accessible electrical wiring, and a moisture-friendly floor surface. Concrete, tile, or vinyl. Never carpet.
Factor in the transition path too. Where will you cool down after a session? A nearby shower or outdoor door makes a huge difference. Dripping sweat through the hallway isn’t the vibe.
Ceiling height tip: Keep it at 7 feet or under. Heat climbs. Every unnecessary inch above you wastes energy and weakens the experience.
2. Choose Between Traditional and Infrared — This Shapes Your Entire Build
This is the defining decision. Make it before you buy a single board.
Traditional (Finnish) sauna: A heater warms stones. You pour water over them for bursts of steam. Room temperatures range between 150°F and 195°F. This is the classic, intense experience.
Infrared sauna: Panels heat your body directly, not the surrounding air. Lower operating temperatures, roughly 120°F to 150°F. More energy-efficient. Considerably simpler to install. A 2-person infrared sauna can even run on a standard 120V plug.
Your choice here ripples through every subsequent decision — materials, wiring, ventilation design, insulation requirements.
Crave the real, steamy heat? Traditional.
Prefer something gentler and more straightforward? Infrared.
Both are legitimate. They simply serve different preferences.
3. Nail the Sizing — Going Too Big Is a Rookie Mistake
This is where good money goes bad.
People build oversized saunas. Then the heater strains. The room barely reaches temperature. Energy costs climb. And the whole experience feels underwhelming.
A home sauna should be tight and efficient.
- One person: 3’ x 3’ infrared, 4’ x 4’ traditional — a compact 2-person traditional sauna works perfectly at this scale too
- Two people: 4’ x 6’ comfortably
- Family use: 5’ x 7’ — spacious without being wasteful. A 4-person indoor traditional sauna in cedar hits this sweet spot beautifully.
Always match heater capacity to room volume. Every manufacturer publishes cubic footage specs. Calculate yours. Don’t wing it.
An undersized heater runs endlessly without delivering. An oversized one creates safety risks.
4. Selecting the Right Wood — Not All Species Can Handle the Heat
Here’s where the project starts feeling real. And where your budget comes into sharp focus.
Western red cedar sits at the top for good reason. It resists moisture naturally, smells wonderful, stays comfortable against bare skin, and ages with grace.
Other proven choices:
- Hemlock: Easier on the wallet than cedar, clean appearance, almost no smell. Available as tongue-and-groove wall boards in a similar light-toned profile.
- Basswood: Ideal for allergy-prone individuals
- Nordic spruce: A European favorite, excellent heat and moisture tolerance
Hard pass on: Pine (sap bleeds at high temperatures), oak (gets dangerously hot to touch), and pressure-treated wood (releases toxic fumes when heated — seriously harmful).
Install tongue-and-groove paneling, ¾” to 1” thick, horizontally on walls. Clean look, easy single-board replacement if needed.
For bench surfaces, use 2x4s in your chosen wood. Round all edges. Bare skin and sharp corners don’t mix.
5. Insulation and Framing — What Nobody Sees, But Everyone Feels
Insulation doesn’t make the highlight reel. But without it, your sauna is just a warm disappointment.
Framing: Basic 2×4 stud walls, 16 inches on center. Standard residential construction practice.
Insulation: Fiberglass batt, R-13 for walls, R-22 minimum for ceilings. The ceiling is the most critical surface — under-insulate it and your heat escapes upward.
Vapor barrier: The most commonly skipped step. And the one that causes the most devastating long-term problems.
Install an aluminum foil vapor barrier on the warm side of the insulation (facing the sauna interior). It reflects radiant heat back into the room and stops moisture from penetrating into the wall cavity.
Not plastic. Not building wrap. Aluminum foil barrier, engineered for extreme heat.
Overlap all seams. Tape meticulously with foil tape. Any gap becomes a moisture entry point that will silently destroy your framing.
6. Ventilation — The Step That Saves Your Health and Your Wood
Without ventilation, your sauna is a sealed danger zone.
Create two openings: a low intake vent on one wall (near the heater, about 6 inches from the floor) and a high exhaust vent on the opposite wall (near the ceiling, with an adjustable damper).
This simple setup creates convection. Cool air enters, warms, rises, and pushes stale air out.
Each vent is only about 4” x 6”. Tiny in size. Enormous in importance.
Without airflow, CO₂ builds. You feel lightheaded. Headaches hit. And between sessions, your wood never dries properly — which means mold.
Ventilation isn’t a luxury feature. It’s a health and safety essential.
7. The Heater — Choose Wisely, Because This Is the Core
Everything hinges on this component.
Traditional sauna heaters:
Electric units are the smartest option for indoor DIY saunas. Choose one with built-in or wall-mounted controls. Size it precisely to your room’s cubic footage.
These heaters typically demand a 240V dedicated circuit, drawing 30 to 60 amps. This is not your standard wall outlet. A heater like the Harvia 6kW KIP is a good reference point for planning your electrical load.
Bring in a licensed electrician. This is non-negotiable. Improper high-voltage wiring can cause a fire. Not theoretically. Actually.
Infrared heaters:
Far less complex. Many run on a regular 120V plug. Lower power consumption, gentler temperatures, less structural strain on the room. A 2-person far infrared sauna in cedar plugs in like any household appliance.
For a first-time builder wanting the least complicated route, infrared is genuinely the easier path.
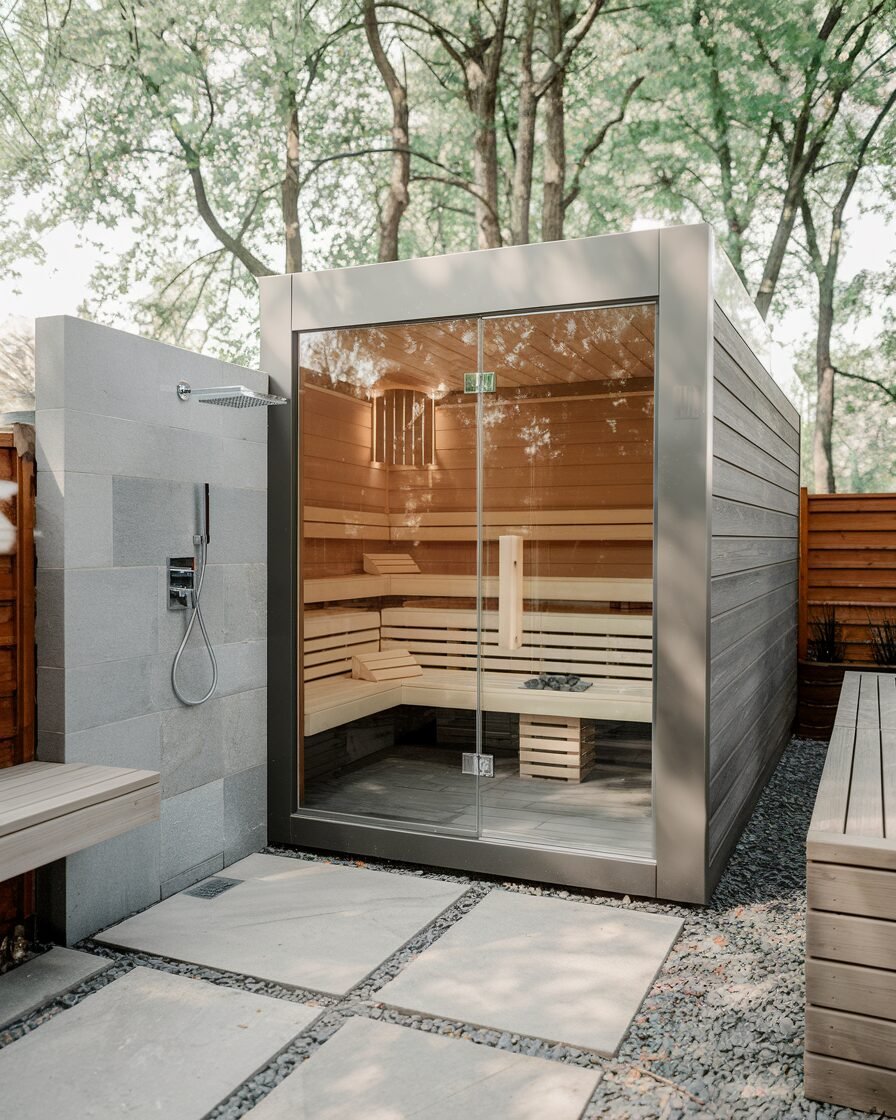
8. The Door — Straightforward But Critical
The sauna door should be solid and must swing outward.
The reason? If someone faints inside, an outward-opening door won’t be blocked by their body.
Tempered glass doors let light in and reduce the closed-in feel of a compact space. A wooden door with a small glass panel works equally well.
Latch mechanism: magnetic catch or roller latch only. Never a lock. You never want someone trapped inside a room that’s near 190°F.
9. Lighting — Create Warmth Without Creating Danger
Regular household fixtures can’t survive sauna conditions. They’re not built for that environment.
Use sauna-rated vapor-proof fixtures. Heat-resistant LED strips made for sauna use also produce beautiful, low-key ambient light.
Position lighting behind benches or above sight line. You’re building a place to unwind, not an office.
If your fixture allows it, add a dimmer switch. It’s a small upgrade that makes a real difference.
10. Finishing Elements That Turn a Room Into a Ritual
The construction is done. Now give it character.
Bench design: L-shaped layouts maximize space beautifully. Upper bench for the serious heat seekers, lower bench for a gentler sit or foot rest. A solid sauna bench in Western red cedar is the single most important surface in the room.
Backrest: Build a simple angled rest from the same wood you used for benches. Minimal effort, major comfort upgrade. Or shop a ready-made sauna backrest for instant comfort.
Bucket and ladle: Essential for traditional saunas. Pour water over the rocks and release the löyly — that glorious burst of steam that defines the Finnish ritual. A quality bucket and ladle set made from real wood is all you need.
Instruments: A thermometer and hygrometer at seated head height, opposite the heater. Monitor conditions at a glance. Add a sand timer on the wall — the classic way to track your session without a phone in your hand.
Flooring: Stick with tile or concrete. Place a duckboard — a removable slatted wood mat — on top for comfort and drainage.
11. Curing the Wood and Taking Your First Real Session
Don’t rush the maiden voyage.
Heat the sauna to around 140°F for one to two hours. Open the door briefly a few times. This curing process releases trapped moisture from the wood and lets natural oils stabilize.
Do this two or three times before sitting down for a real session.
A strong cedar or wood aroma during curing is perfectly normal. It mellows quickly.
Once cured, bring the temperature up. Pour water on the rocks if you went traditional. Close your eyes.
This is yours. You built it.
Stop Scrolling. Start Building.
Here’s what most people never realize.
A home sauna is more than a renovation project. It’s a commitment to yourself.
It says you prioritize your health, your peace, your space. It says you don’t just pin ideas to boards — you bring them to life.
A few weekends of work? Yes.
A hiccup or two along the way? Probably.
Worth every minute when you sit in your own handmade sauna on a cold night and feel the world melt away?
Beyond question.
Put down the phone. Pick up the measuring tape.
🔍 Focus Keyphrase: home sauna DIY
📌 SEO Title: Home Sauna DIY: Build One Yourself — Complete Guide
🔗 Slug: home-sauna-diy-build-one-yourself
📝 Meta Description: Learn how to build a home sauna from scratch. Location, wood, insulation, heater, ventilation — everything you need to DIY it right. Start building today.